Surface Finishes
- General Overview
- Tips and Tricks
- Related Tools
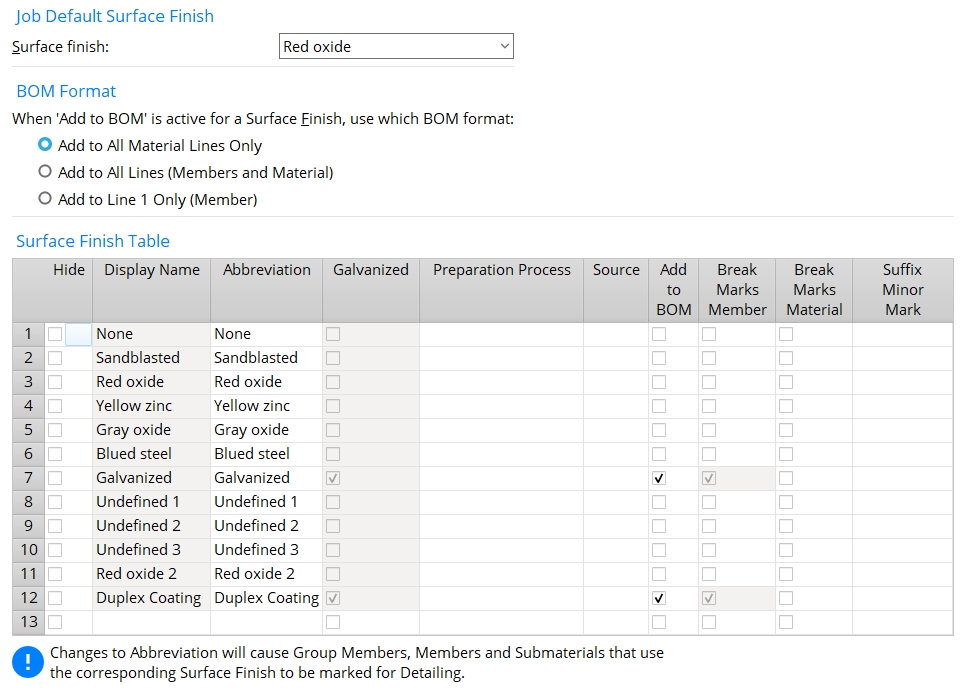
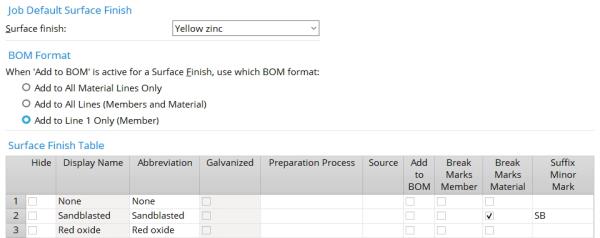
Job Default Surface Finish
Surface Finish:None or Sandblasted or Red oxide or Yellow zinc or Gray oxide or Blued steel or Galvanized or Undefined 1 or Undefined 2 or Undefined 3 or Red Oxide 2 or Duplex Coating or Any user added surface finish. The finish that you select affects any newly added members in the model.
Status Display: Material Status > Material Surface Finish
Report Writer: MemberMaterial.Material.SurfaceFinish
Report Writer: Member.Settings.SurfaceFinish
Advanced Selection: m.Finish
Advanced Selection: m.Finish_abbr
BOM Format
BOM Format: Add to All Material Lines Only or Add to All Lines (Member and Material) or Add to Line 1 Only (Member). This option applies when Add to BOM is checked ![]() )
)
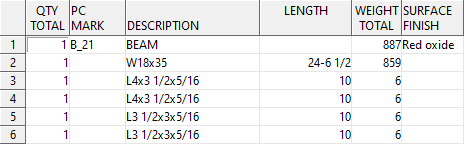
Add to All Material Lines Only places what data is set inside the Abbreviation of the finish to each of the material lines inside of the bill of material.
Surface Finish Table
Hide: ![]() or
or ![]() . This option sets whether or not a surface finish will be available in the selection list in the model.
. This option sets whether or not a surface finish will be available in the selection list in the model.
If this box is checked (
), the surface finish is not available to select in the model.
If the box is not checked (
), the member will not be flagged as galvanized. The Galvanizing Check Tool will not work on such members.
Display Name: Any text string to denote the name of the surface finish (e.g., Red Oxide, Sandblasted, Galvanized, Peter, whatever name you want). Surface finishes entered here are selectable in Modeling wherever surface finishes are selectable (Member and material edit windows).
Note: The first 12 in this list cannot be altered.
Abbreviation: Any text string to denote how the name of the surface finish is displayed in the Bill of Material, and different exports (3D model and MRP exports).
Note: MRP exports will use this abbreviation if it is changed by the user. Exports like KISS that have always exported simplified nomenclature for the finishes will remain doing so, unless the user manually changes the abbreviations for the default finishes here.
Report Writer: MemberMaterial.Material.SurfaceFinishAbbrev
Report Writer: Member.Settings.SurfaceFinishAbbrev
Advanced Selection: m.Finish
Advanced Selection: m.Finish_abbr
Galvanized: ![]() or
or ![]() . This option will apply galvanizing options to any surface finish that has this check box checked.
. This option will apply galvanizing options to any surface finish that has this check box checked.
If this box is checked (
If the box is not checked (
Report Writer: MemberMaterial.Material.SurfaceFinishIsGalvanized
Report Writer: Member.Settings.SurfaceFinishIsGalvanized
Report Writer: Member.Conditions.Galvanized
Advanced Selection: m.Galvanized
Preparation Process: Any text string to denote what preparation or cleaning may need to be done for the surface finish. This value will primarily be used for reports. This value will not be used in breaking apart piecemarks.
Report Writer: MemberMaterial.Material.SurfaceFinishPrep
Report Writer: Member.Settings.SurfaceFinishPrep
Source: Any text string to denote where the surface finish materials are supplied from. This value will primarily be used for reports. This value will not be used in breaking apart piecemarks.
Report Writer: MemberMaterial.Material.SurfaceFinishSource
Report Writer: Member.Settings.SurfaceFinishSource
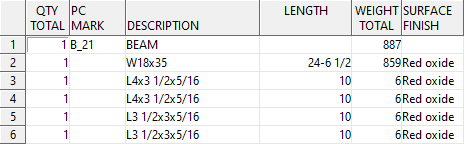
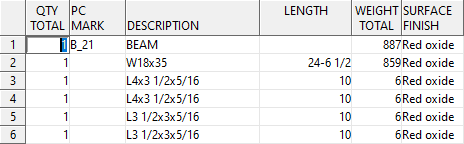
Add to BOM: ![]() or
or ![]() . This option sets whether or not the surface finish will be listed in the bill of material.
. This option sets whether or not the surface finish will be listed in the bill of material.
If this box is checked (
If the box is not checked (
Note: Surface Finishes must have an active plot order in the Bill of Material Layout for this finish to show in the bill of material.
Break Marks Member: ![]() or
or ![]() . The choice made here directly affects the piecemarks of members based on the surface finish applied.
. The choice made here directly affects the piecemarks of members based on the surface finish applied.
If this box is checked (
If the box is not checked (
Note: Ideally this should be set before members are added in a new project. If you do change this setting after you have already added members, you should run Verify and Fix to ensure continuity of member piecemarking within your Job.
Report Writer: Member.Settings.SurfaceFinishBreakMajor
Break Marks Material: ![]() or
or ![]() . The choice made here directly affects the submaterial of members based on the surface finish applied.
. The choice made here directly affects the submaterial of members based on the surface finish applied.
If this box is checked (
If the box is not checked (
Note: Ideally this should be set before members are added in a new project. If you do change this setting after you have already added members, you should run Verify and Fix to ensure continuity of piecemarking within your Job.
Report Writer: MemberMaterial.Material.SurfaceFinishBreakMinor
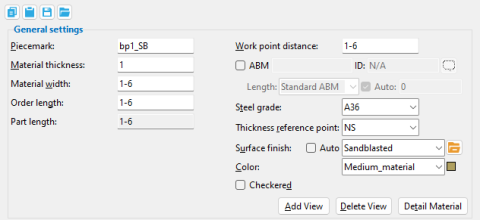
Suffix Minor Mark: This option ONLY applies to Standard Piecemarks. This applies when Break marks material is checked. It affects the submaterial marks of members. This is up to a four character text string that is appended to the end of the minor mark.
|
The Suffix Minor Mark is filled out for Sandblasted as SB. |
|
This base plate has the surface finish set as Sandblasted. Looking at the Piecemark: it shows as bp1_SB showing the minor mark has appended the SB for the surface finish to the end. |


|
|
OK (or the Enter key) closes this screen and applies the settings.
Cancel (or the Esc key) closes this screen without saving any changes.
Reset undoes all changes made to this screen since you first opened it. The screen remains open.
- Process & Create Solids
- Surface Finish Plugin Updates (Python Plugin updates)
- Surface Finishes (index)

